
Green tea face mist: a simple glow-up recipe to use before moisturiser
If you’ve ever stood in front of your bathroom mirror wondering whether there’s a way to make your skincare routine feel a bit more like a spa treatment and a bit less like a chore, a green tea face mist is a good place to start. It’s cheap, it takes minutes to make, and it does a genuinely useful job sitting between cleansing and moisturising.
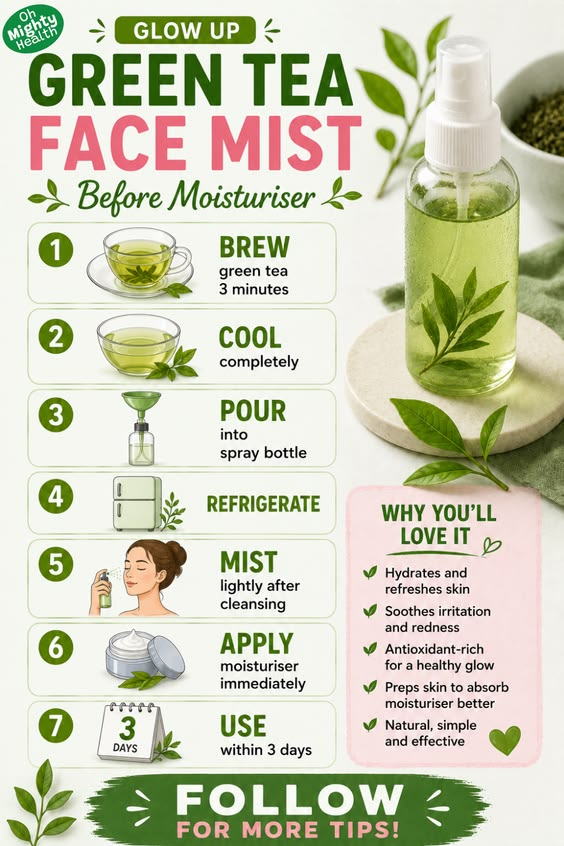
Let’s get into what this mist actually does, how to make it properly, and the bits the pin doesn’t have room to mention.
I’m Patri Hernández, a certified organic skincare formulator and dermocosmetic technician with a background in health coaching, specialising in botanical ingredients and evidence-informed natural skincare.
This post may contain affiliate links, meaning I could earn a small commission if you buy something through one of them, at no extra cost to you. I only recommend products and ingredients I genuinely think are worth your time.
What is a green tea face mist, and why bother with it?
A green tea face mist is exactly what it sounds like: brewed green tea, cooled and decanted into a spray bottle, used as a light hydrating step before moisturiser.
It’s not a new idea. Green tea has been used topically and internally for centuries, and modern formulators still reach for it because it’s genuinely useful, not just because it sounds pretty on a label.
What’s actually in green tea that’s good for skin?
Green tea is rich in polyphenols, particularly a compound called EGCG (epigallocatechin gallate), along with other catechins and a smaller amount of caffeine.
These compounds have antioxidant properties, meaning they help neutralise free radicals, the unstable molecules generated by UV exposure, pollution, and general everyday life that contribute to premature skin ageing.
There’s a reasonable body of research looking at topical green tea extract and its potential to calm visible redness and support the skin barrier, which is why you’ll see it in serums, toners, and moisturisers, not just teabags.
I’d stop short of calling it a cure for anything. It’s a supportive, well-tolerated ingredient with decent evidence behind it, not a miracle worker, and a diluted homemade infusion will always be gentler and less concentrated than a formulated extract.
Why mist before moisturiser, specifically?
This is the part that trips people up, because misting can feel like an optional extra. It isn’t, and here’s why.
Skin absorbs moisturiser more effectively when it’s slightly damp rather than bone dry. This is sometimes referred to as layering onto “damp skin,” and it’s a genuinely useful technique, not a marketing trick.
Misting after cleansing:
- Replaces some of the moisture cleansing removes
- Gives your moisturiser a damp surface to lock hydration into
- Delivers a light dose of antioxidants directly to the skin
- Feels genuinely refreshing, particularly in warm weather or after exercise
Think of it as prepping the canvas before you paint, rather than an indulgent extra step you can skip when you’re in a rush.
What you’ll need
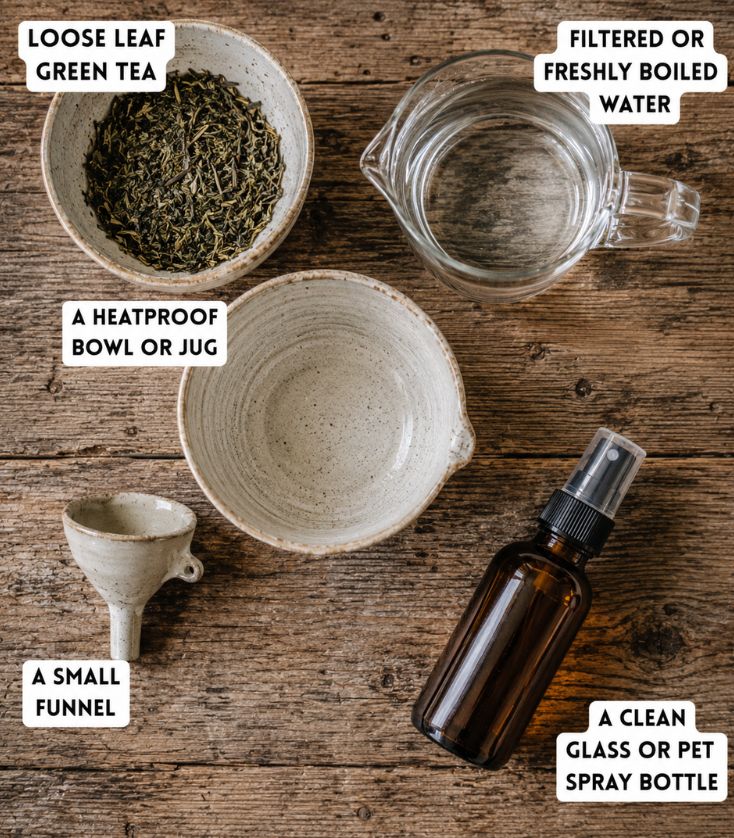
- Loose leaf or bagged green tea (a good quality green tea, not a flavoured or blended one, gives the cleanest result)
- Filtered or freshly boiled water
- A heatproof bowl or jug
- A small funnel
- A clean glass or PET spray bottle
- A fridge
Glass is preferable to plastic where possible, since tea polyphenols can degrade slightly faster in some plastics, though a food-safe PET spray bottle is perfectly fine for something you’ll use up within days.
How to make green tea face mist: step by step
1. Brew the tea
Steep your green tea for around 3 minutes in freshly boiled water that’s been allowed to cool for a minute or two first.
Water that’s too hot (fully boiling, straight off the kettle) can scorch green tea and draw out excessive tannins, which makes the brew taste bitter and can be slightly more astringent on skin. Slightly under boiling point is ideal.
2. Cool it completely
This step matters more than it looks. Bottling warm tea creates the perfect conditions for bacteria and mould to take hold, which is the last thing you want spraying onto your face daily.
Let it cool fully to room temperature before moving on. If you’re impatient, popping the bowl in the fridge for 20 minutes speeds this up safely.
3. Strain and pour into your bottle
Strain out any loose leaves or the teabag, then use a small funnel to pour the cooled liquid into your clean spray bottle.
Always sanitise your bottle before use. A quick rinse with boiling water or a splash of high-proof alcohol, left to air dry, reduces the risk of contamination in a product with no preservative system.
4. Refrigerate
Store your mist in the fridge, not on the bathroom shelf. This isn’t just about keeping it feeling cool and refreshing on the skin, it’s a genuine safety step.
Because this recipe contains no preservative, refrigeration is what buys you those few extra days of usable life.
5. Mist lightly after cleansing
Hold the bottle around 15 to 20cm from your face, close your eyes, and mist in a couple of light passes. There’s no need to soak yourself.
6. Apply moisturiser immediately
While your skin is still damp, follow straight away with your usual moisturiser. This is the step that actually locks in the benefit of misting, so don’t leave a long gap here.
7. Use within 3 days
This is a genuinely important instruction, not just a suggestion. More on why below.
Why the 3-day limit isn’t just being overly cautious
Homemade green tea mist has no preservative, no antimicrobial system, and no pH adjustment, which is exactly what a properly formulated cosmetic product would have.
That means bacterial and mould growth can begin surprisingly quickly, even in the fridge, particularly once the bottle is opened and repeatedly exposed to air and the nozzle mechanism.
Using an expired batch on your face, especially around the eyes, isn’t worth the risk. If your mist smells off, looks cloudy, or has any visible particles floating in it, discard it rather than trying to “use it up.”
If you want something with a longer shelf life, that’s where a small amount of a proper cosmetic preservative or switching to a formulated green tea toner becomes the more practical option for daily long-term use.
Choosing your tea (and what to avoid)
- Plain green tea is your safest, most tested option
- Matcha can be used but tends to leave more sediment and can stain lighter fabrics or bottles
- Avoid flavoured or blended teas containing citrus oils, as these can increase photosensitivity or irritation on facial skin
- Organic tea reduces the chance of pesticide residue ending up in your mist
Can you customise the recipe?
Yes, within reason, and this is where a bit of formulation knowledge helps you avoid common mistakes.
- Rosewater or aloe vera juice: can be blended in at up to half the total volume for extra soothing and hydration
- Glycerin: a small amount (around 1 to 2%) can improve the humectant, hydrating effect
- Essential oils: I’d generally advise against adding these to a water-only mist. Essential oils don’t dissolve in water without an emulsifier, so they’ll sit on the surface and can land on skin undiluted, which increases the risk of irritation or sensitisation, particularly around the delicate eye area
If you want a scented mist, a proper hydrosol (like rose or chamomile water) is a much safer route than essential oils.
Common mistakes to avoid
- Bottling the tea while it’s still warm
- Skipping moisturiser afterwards, which lets the water simply evaporate and can leave skin feeling tighter than before
- Storing the bottle outside the fridge
- Keeping it beyond 3 to 4 days “just in case”
- Using a strong, over-brewed tea, which can feel drying and slightly tannic on skin
- Spraying directly into wide-open eyes at close range
Who should be a bit more cautious
Green tea mist is well tolerated by most skin types, but a few things are worth flagging.
If you have very reactive, eczema-prone, or broken skin, patch test on your inner arm first and wait 24 hours before using it on your face.
Caffeine sensitivity is generally a concern for oral intake rather than topical use, since very little is absorbed through skin, but if you’re specifically avoiding all caffeine sources during pregnancy, it’s worth mentioning to your midwife or doctor as a precaution rather than assuming it’s automatically fine.
How often should you use it?
Daily use after cleansing, morning and evening, is fine for most people. Some people also like a light mist midway through the day over makeup for a quick refresh, though I’d use a separate small travel bottle for that rather than carrying your fridge-stored bottle around all day.
Frequently asked questions
Does green tea mist replace moisturiser?
No. It’s a hydrating prep step, not a substitute. Skipping moisturiser afterwards means the water will simply evaporate, taking some of your skin’s natural moisture with it.
Can I use decaffeinated green tea?
Yes, if you’d rather avoid caffeine altogether for personal reasons. The antioxidant content will be similar, since decaffeination targets caffeine, not polyphenols.
Is it suitable for oily or acne-prone skin?
Generally yes. Green tea’s astringent, antioxidant qualities are often well tolerated by oilier skin types, though as with any new addition, patch testing first is sensible.
Why does my mist go cloudy?
This is a sign of microbial growth or oxidation and means it’s time to bin it and make a fresh batch, regardless of how many days it’s technically been.
There’s something quite satisfying about making your own skincare from three ingredients you can pronounce, and this is one of those rare DIY recipes that’s genuinely simple enough to actually stick with. Keep your batches small, your bottle clean, and your timeline honest, and it earns its place in your routine.
Love, Patri xx
